Taming the Blues Junior: A Blackface‑Flavored Makeover

Transparent Blues Junior mods for bigger blackface‑style cleans, tighter modern drive, and a more open, responsive feel—without losing the grab‑and‑go practicality of your favorite 1×12 combo.

Taming the Blues Junior: A Blackface‑Flavored Makeover

The Fender Blues Junior has earned its place on stages and in studios as the “grab‑and‑go” 1×12 combo: small, loud enough for a drummer, with that familiar mid‑forward Fender grind when you lean on it. But as beloved as it is, many players eventually run up against the same limitation: the amp breaks up early, feels a little boxy, and doesn’t quite deliver the big, open, glassy clean of the classic blackface Fenders it visually evokes.

If you think of the Blues Junior as a great little platform rather than a sacred object, that’s where this set of mods comes in. Done thoughtfully, a few targeted circuit changes can nudge the amp out of its tweed‑ish, mid‑heavy voice and into a more spacious, “Fendery” blackface territory—without losing the portability and practicality that make it appealing in the first place.

This isn’t about turning the Blues Junior into a museum‑correct Twin Reverb. It’s about refining the finesse: a cleaner, more articulate front end, a tone stack that behaves more like a classic Fender, and a power amp that breathes rather than barks, while still retaining the amp’s ability to distort in a tight, modern way when pushed.

Stock DNA: Why the Blues Junior Doesn’t Quite “Blackface”

On paper, the Blues Junior looks straightforward: three 12AX7s, a pair of EL84s in fixed‑bias push–pull, a spring reverb, and a master volume. In practice, several design choices steer it away from the iconic mid‑’60s blackface tone:

  • Tone stack placement and voicing: Unlike a classic blackface (where the tone stack sits right after the first gain stage and before the volume control), the Blues Junior parks its tone stack later in the preamp, and with values that emphasize the low mids and midrange rather than the familiar blackface scoop.
  • Volume‑control treble bleed: A small capacitor on the volume pot keeps the sound bright at low settings, but in this amp it can make the tone feel thin and prickly when you’re running it quietly.
  • Input and gain structure: A relatively low input grid‑stopper and the way the gain is staged contributes to early breakup and a sensation of the amp being “touchy” or overly sensitive at the front end.
  • EL84 power section: The EL84 pair, run relatively hot in the stock fixed‑bias arrangement, compresses and crunches sooner than the 6V6 or 6L6 pairs in the classic blackface amps.
  • Presence and negative feedback network: The Junior uses a presence circuit wrapped around its negative feedback loop, which gives a useful bright edge in stock form but is not part of the classic blackface vocabulary.

The net result is a very usable club amp that leans slightly “British‑meets‑tweed” rather than the airy, piano‑like clean of a Twin or Deluxe Reverb. Many players love it as‑is; others hear a great blackface‑style tone hiding in there, waiting to be let out.

The Goal: More Fendery, More Clean, More Control

The mod path I’m outlining here is aimed at players who want the Blues Junior to behave more like a small blackface platform while retaining a tight, modern distortion character when it finally lets go.

The goals are simple:

  1. Cleaner headroom and better sensitivity: The amp should stay clean longer, respond predictably to your picking dynamics, and take pedals without collapsing into fuzz at modest stage volumes.
  1. Classic Fender tonal balance: Less boxy low mids, more controlled bass, a gentle mid scoop, and a sweet, singing top end that still lets you dial brightness with the tone controls rather than baking it into the circuit.
  1. More composed power amp behavior: Lowered bias and a revised feedback network for a feel that’s more blackface than hot‑rodded combo, while still remaining tight and focused in the low end.

The key is that we do not change the coupling caps: we want the amp to stay tight in the bass and distort in a more modern, controlled way, instead of flubbing out when pushed.

log in to continue reading

Step 1: Taming the Front End — Input Sensitivity and Volume Behavior

Input grid stopper: 33 kΩ for more civilized sensitivity

The first stop is right at the door: the grid‑stopper on the input of the first preamp stage. In the stock circuit, the value chosen makes the amp feel a bit eager, particularly with hotter pickups. By changing this resistor to 33 kΩ, we subtly reshape the amp’s sensitivity.

A grid stopper of this value still allows plenty of high‑frequency content and doesn’t “darken” the amp, but it helps smooth out the way the first stage responds to strong transients and high‑output pickups. The feel under the fingers becomes more controlled and less twitchy, which is exactly what you want if you’re going for blackface clarity rather than ragged break‑up at the slightest provocation.

Removing the treble cap on the volume pot

The Blues Junior ships with a small capacitor on the volume control that bypasses some high frequencies around the pot, keeping the sound bright at low settings. In theory, this counters the natural darkening that happens as you turn down; in practice, on this amp, it can make things sound too thin and brittle at modest volumes.

Removing that treble‑bleed cap:

  • Makes the volume taper feel more natural and progressive, especially between “1” and “3.”
  • Keeps the tone full and balanced at lower loudness, so you don’t get a shrill, glassy top end when playing quietly.

Because of the other transparency‑oriented changes we’re making, the amp is still open and articulate; it simply isn’t forced into “ice‑pick mode” whenever you keep the volume in civilized territory.

Step 2: Re‑Voicing the Tone Stack — Going Twin Reverb

A big part of the Blues Junior’s identity lives in its tone stack—the network behind the Bass, Mid, and Treble knobs. In stock form, the stack leans toward a mid‑forward voice and behaves differently from the familiar blackface response many players are used to.

Here, the change is decisive: we re‑voice the tone stack to follow a Twin Reverb topology and set of values.

What the Twin‑style stack does

The classic Twin/blackface stack uses specific capacitor and slope resistor values to create:

  • A recognizable mid scoop that leaves room for vocals and other instruments, but doesn’t hollow out the guitar.
  • A tight, controllable low end that doesn’t swamp the power section.
  • A treble response that can be bright and sparkly, but is easily tamed with the Treble control and guitar tone knob.

Translating those values into the Blues Junior gives the tone controls a much more familiar Fender feel: when you set everything to “5,” you get a balanced, usable sound, and small moves on Bass or Treble produce predictable results rather than wild swings.

Keeping it open, not harsh

Because we’re not using a presence circuit (more on that later), this new tone stack becomes the main high‑end sculptor in the amp. The combination of the Twin‑style network and the removal of the volume treble bleed ensures the amp is open and transparent without being razor‑sharp.

If you’re used to blackface amps, the EQ now feels instantly familiar—only this time, it’s coming out of a compact EL84 combo instead of a 2×12 or 4×10 beast.

Step 3: V2B Stability — The 1 MΩ Grid Leak

In the course of opening up the preamp and changing how the tone stack interacts with the following stages, it’s good practice to keep the downstream triodes happy and predictable. To that end, we add a 1 MΩ grid‑leak resistor to V2B.

This resistor isn’t strictly mandatory for the amp to function, but:

  • It provides a defined DC reference for the grid of V2B, helping stabilize operating conditions.
  • It contributes to consistent behavior across tubes and over time, which is especially useful on an amp that may see a lot of gigging and frequent tube changes.

Think of it as a small, invisible insurance policy: the player may never notice it directly, but it helps ensure the revised preamp behaves itself in the long run.

Step 4: Removing C35 — Fixing the Nasal Mid Filter

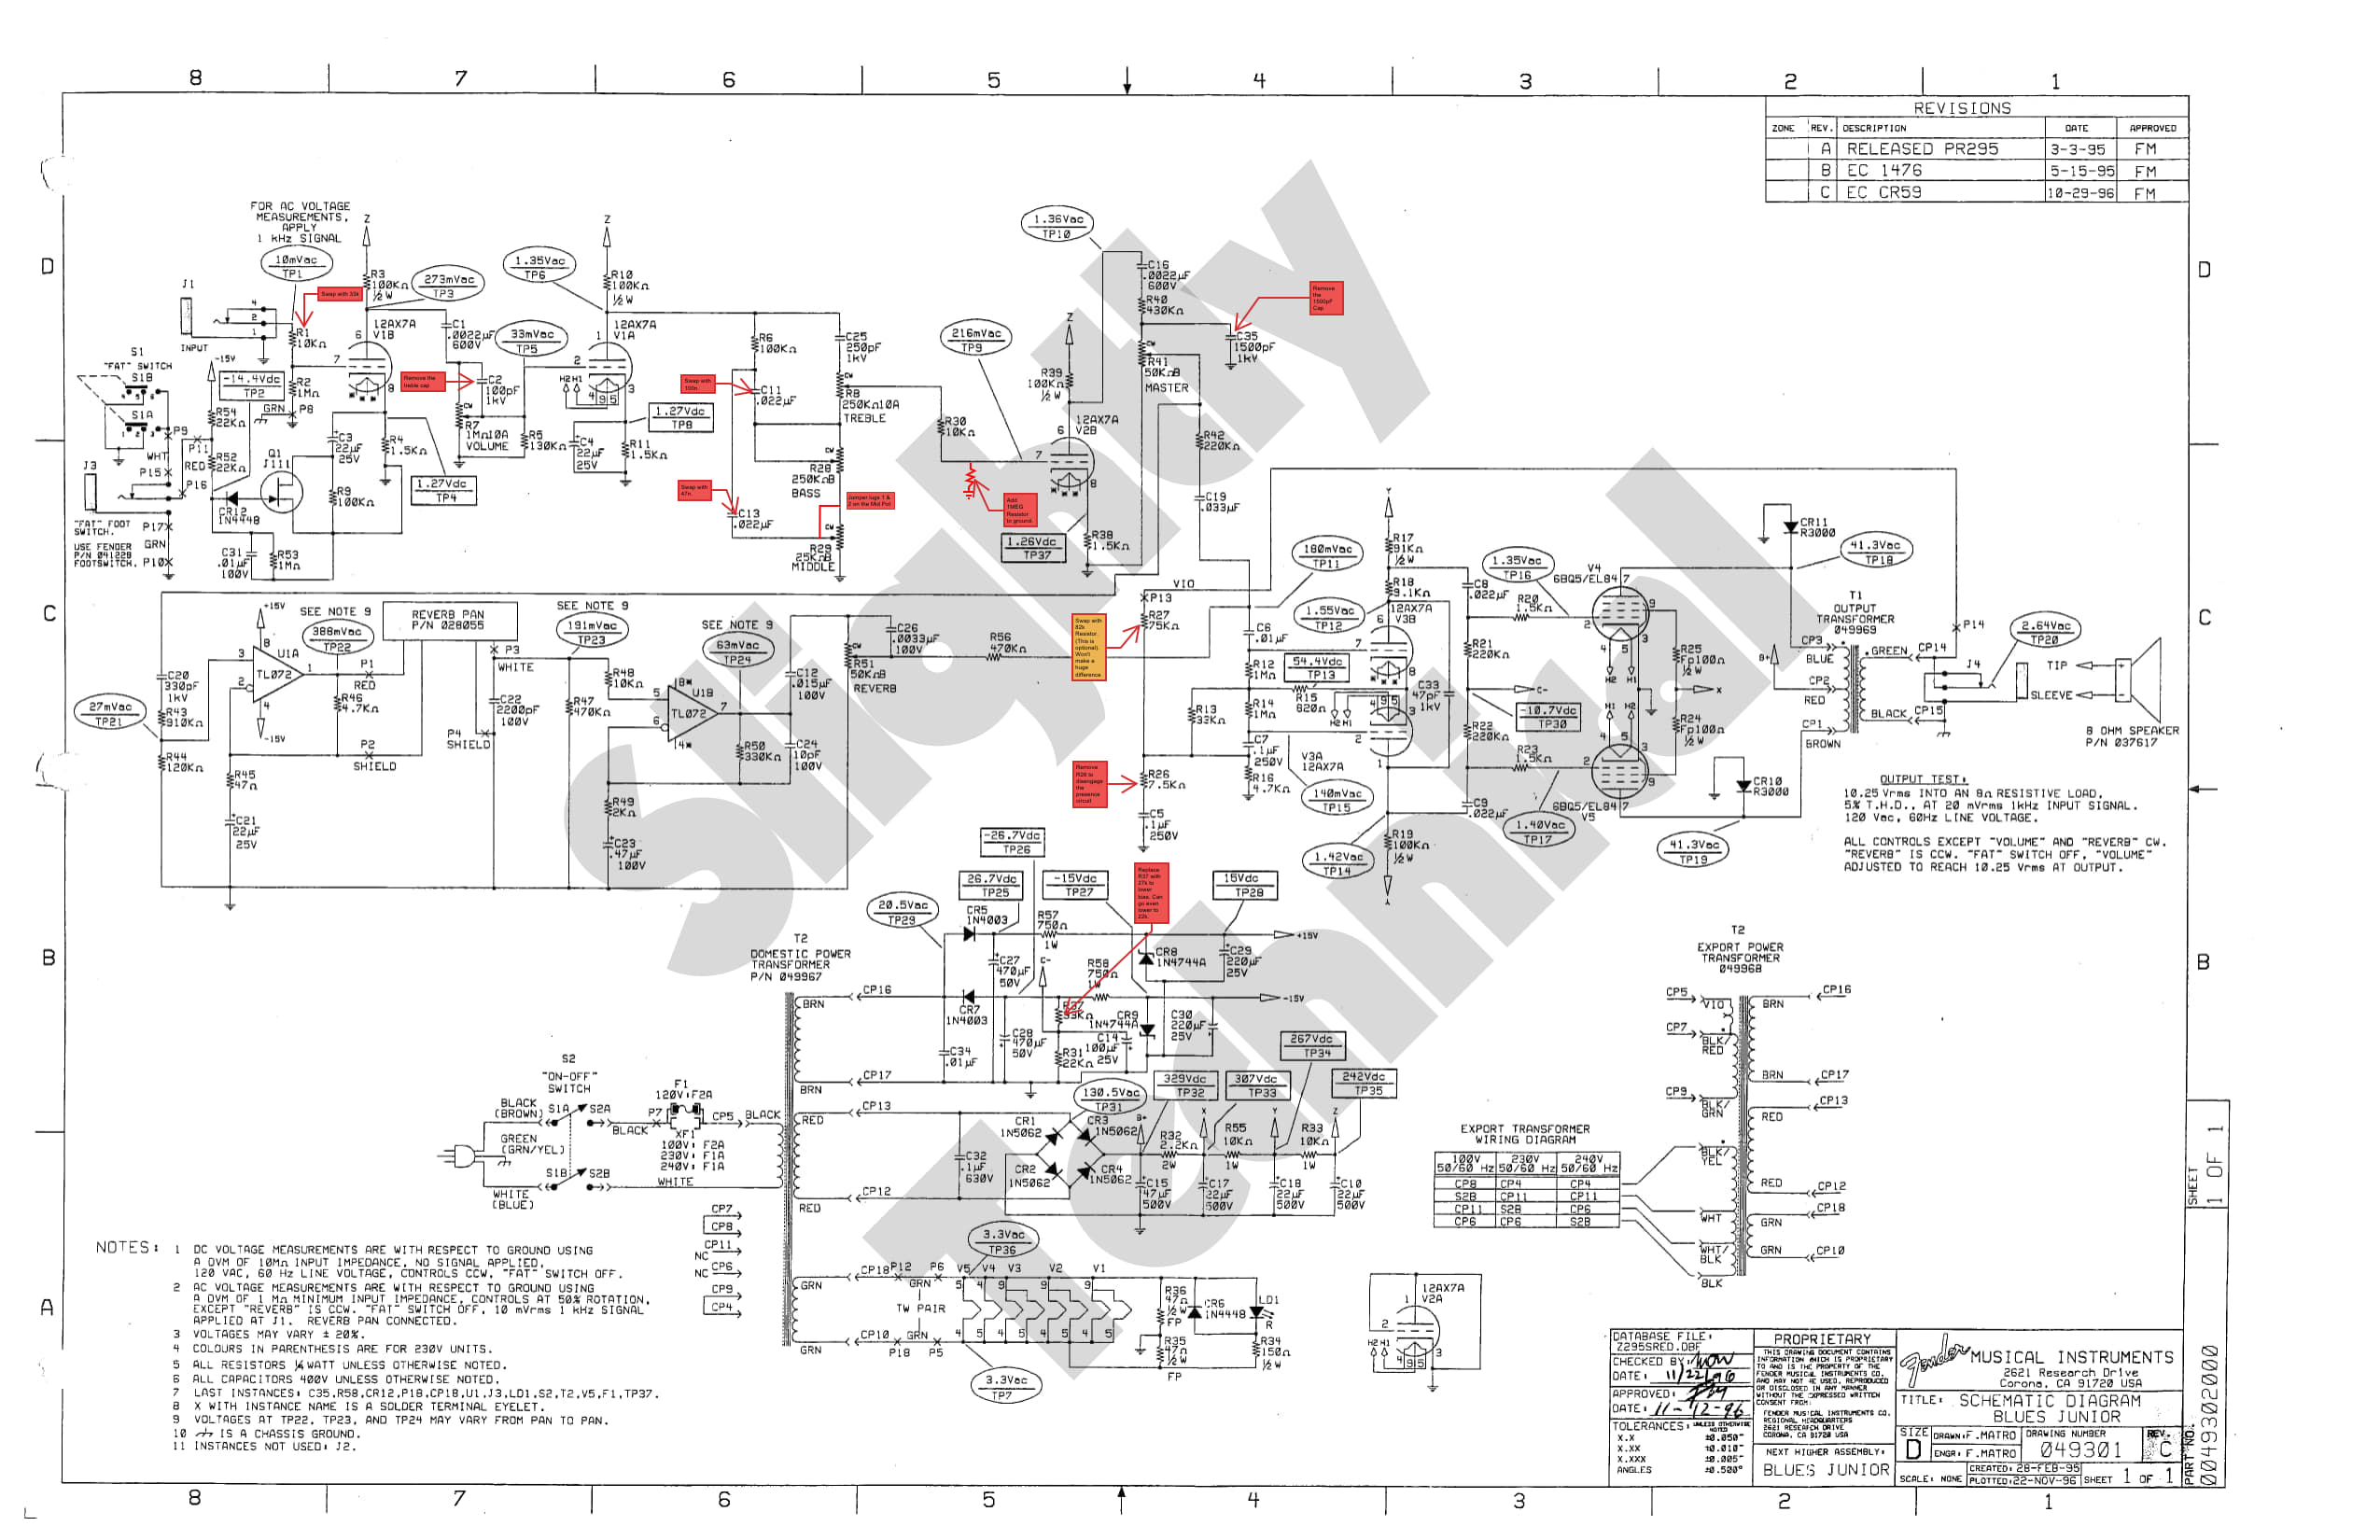
On the Rev. C schematic, capacitor C35 sits in the preamp in a position that forms a filter centered roughly around 250 Hz. Rather than simply boosting the highs, this network rebalances the lows and highs around that point, carving into the low‑mid region and shifting the spectrum in a way that emphasizes the upper mids.

The audible result is a more nasal, honk‑prone character: the amp feels like it’s been mid‑filtered, and you then have to compensate for that with the presence control and other EQ moves. I don’t like building in that kind of fixed low‑mid notch and then trying to “fix” the feel again later in the circuit.

For this blackface‑leaning voice, we remove C35 outright.

That does two important things:

  • It restores a more natural balance between lows and highs in that stage, getting rid of the built‑in nasal emphasis.
  • It lets the preamp stay genuinely open and even‑handed, so you’re not fighting a hidden mid filter with the presence circuit and tone controls.

In other words, instead of pre‑baking a mid hump and then compensating with presence, we start from a more neutral, open response and let the tone stack and guitar shape the final contour—much closer to the way classic blackface circuits behave.

Step 5: Negative Feedback and Presence — Back to Old Fender Philosophy

Classic blackface amps used a simple negative feedback loop around the power amp to control gain and tighten the response, often without a separate presence control on the front panel. The Blues Junior takes a slightly different route, incorporating a presence circuit that manipulates the high‑frequency content in the feedback path.

For this mod, we tweak the negative feedback network and disengage the presence circuit entirely.

Why ditch presence here?

In many modern designs, presence is a convenient way to dial in extra sizzle on top. But with our preamp now running more open and less nasally filtered, a presence control becomes redundant at best, and counterproductive at worst.

By revising the feedback values and removing the presence circuit from the equation, the power amp:

  • Responds more like an old Fender: firm but not sterile, articulate but not hyped.
  • Gains a more consistent top‑end character across volume settings, rather than shifting feel dramatically as you move the presence control.

The amp’s overall brightness and bite are now governed mainly by the tone stack, speaker choice, and guitar, which is exactly how the classic circuits do it.

Step 6: Biasing the EL84s — Cooler, Cleaner, Still Punchy

The Blues Junior ships with a fixed resistor setting the bias of its EL84 pair, and it runs them fairly hot. A common mod is to add a trim pot so you can dial in the idle current exactly, but for this build the approach is deliberately simpler: we leave the circuit conceptually fixed‑bias, and swap the bias‑set resistor to a value that runs the tubes cooler.

Lowering the bias current:

  • Increases clean headroom in the power amp, pushing the onset of power‑tube distortion further up the dial.
  • Reduces harshness and brittleness when the amp is played loud, giving you a smoother, more controlled transition into breakup.
  • Improves tube life and reliability, since you’re not running the EL84s right at the edge all night long.

You still get the satisfying EL84 crunch when you crank the amp or hit it with a boost, but it’s now more composed and less spiky—a better partner for the blackface‑voiced preamp you’ve just built.

Fender Blues Junior Rev. C with Mods

What We Deliberately Do Not Change: Coupling Caps and Low‑End Character

An important part of this recipe is what stays unchanged. In many vintage‑style mods, coupling capacitors are altered to thin out the low end and prevent flub when the amp distorts. Here, we intentionally leave the coupling caps alone.

Why? Because the goal is not to turn the Blues Junior into a brittle, underfed vintage clone. Instead, we want:

  • A tight, modern bass that holds together under distortion, useful for more contemporary playing and higher‑gain pedal work.
  • A preamp and power amp that stay articulate and focused even as they overdrive, rather than collapsing into mush.

The combination of a Twin‑style tone stack, de‑nasalized preamp (with C35 removed), and cooler‑biased EL84s gives you the cleaner, more “Fendery” front end and midrange you’re chasing, while the original coupling‑cap values retain the modern tightness that many players rely on.

Optional Bright‑Taming Tweaks (If You Really Need Them)

With C35 removed and the preamp opened up, the amp becomes notably more transparent. For many players—and particularly for this style of mod—that’s exactly the point: you shape brightness from the guitar and tone controls rather than fighting a dark circuit.

However, if you find the amp too bright or too open for your taste, there are a couple of optional moves:

  • Reintroduce C35 at a lower value: Instead of restoring the original cap, use something in the 100 pF to 220 pF range, which gently reins in the top end and low mids without re‑creating the same nasal emphasis.
  • Add a 500 pF cap across R39: This introduces a controlled high‑frequency shunt at that point in the circuit, smoothing the amp’s upper edge and taming any remaining “ice pick” tendencies.

These are fine‑tuning tools rather than core parts of the mod. For this style of amp and this target tone, I prefer to leave C35 out entirely and rely on the tone stack and the guitar’s tone knob for shaping. That keeps the sound alive and responsive, especially in a band mix, where a little extra air can be your friend rather than your enemy.

Safety and Reality Check

It bears repeating: a tube amplifier contains lethal voltages, and the Blues Junior is no exception. Even after the amp is switched off and unplugged, its filter capacitors can store enough energy to do serious harm.

If you’re not already comfortable reading schematics, discharging filter caps safely, and working around high‑voltage circuits, this is not the platform on which to learn by trial and error. Seek out a competent amp tech familiar with the Blues Junior; with a schematic in hand, these changes are straightforward for an experienced technician and can be implemented cleanly and reliably.

How It Feels When You Plug In

On paper, these changes are just resistor and capacitor values. In the room, they fundamentally change how the amp behaves.

  • Clean tones: The neck pickup no longer collapses into woolly haze. Instead, you get a piano‑like low end and clear, chiming mids that recall a good blackface Fender, only delivered by an EL84 combo.
  • Edge‑of‑breakup: You can now set the amp right at the verge of compression—dig in and it grits up, back off and it cleans right up, much like a well‑set Deluxe Reverb.
  • Pedals: Overdrives, boosts, and delays feel like extensions of the amp rather than band‑aids for it. The tighter low end and cooler bias keep things articulate; the Twin‑style EQ and open preamp mean your pedals aren’t fighting a baked‑in mid hump or brittle presence peak.

The Blues Junior still sounds like itself—compact, agile, and immediate—but its manners are now firmly in blackface territory. It’s cleaner, more open, more controllable, and more versatile without sacrificing the tight, modern distortion character that makes it such a useful working amp.

For anyone who has ever liked what a Blues Junior almost does, and wished for more finesse, this set of mods represents a sweet spot: a practical, giggable combo that finally lives up to its blackface looks.

Tech Pages

More articles for you

all articles
Effect Pedals
Electronics
Why Guitar Pedals Sound Different on Batteries vs Power Supplies?
A deep dive into why some guitar pedals sound different when powered by batteries versus regulated power supplies—complete with circuit analysis and practical insights.
read
Guitar Amplifiers
Electronics
Why Reactive Loads Sound Different From Real Cabinets
Understanding the nuanced behavior of reactive loads, speaker impedance, and amplifier dynamics—so you can make informed gear choices.
read
Electronics
Building Better Pedals: The Real Role of Components in Guitar Tone
A practical, myth-busting guide to how resistors, capacitors, transistors, ICs, and more actually influence the tone, reliability, and price of your favorite guitar pedals.
read

Register for FREE!

Registration takes less then a minute and it's absolutely FREE!
By joining, you will gain full access to the Tech Pages as well as a bunch of free goodies in the downloads section.
...And a spam-free experience is guaranteed!
Join now
Student 1Student 2Student 4Student 2Student 5
trusted by 500+ students
Overlay ShadowMarko Telecaster